0 Comments
 Taskwarrior stores all the tasks data in the following directory => '~/.task'. Hence, the plan is to regularly backup the contents of this '~/.task' directory to Bitbucket's Hg repository. Note! Regular backup implies only when the data is changed in the '~/.task' directory.
Step 1. Setup SSH authentication with your Bitbucket account Follow all the 7 steps listed in the below blog-post in-order to setup SSH authentication with your remote repository: Hg repository: How to setup authentication using SSH keys on Xubuntu 12.04 for multiple accounts on Bitbucket? Step 2. Create a local Hg repository Now, create a local Hg repository in the directory where the Taskwarrior stores data. Hence, the target directory is '~/.task'. So, run the below commands to setup a local Hg repository: $ cd ~/.task $ hg init $ hg add . $ hg commit -m "Initial commit" Step 3. Setup auto commit & push configuration Now, setup a Python script and respective Hg configurations in-order to auto commit & push to your desired Bitbucket repository: a) Follow all the 5 steps listed in the below blog-post, in-order setup auto commit & push: Hg repository: How to automate commit & push on modification to staged files? b) Now, verify that the 4th line in your Python script reflects the correct path of your local Hg repository i.e. as show below: repo = hg.repository(ui.ui(), '~/.task') Step 4. Setup a crontab job to regular run the above mentioned Python script Now, follow the 2 steps listed in the below blog-post: How to setup a job schedular (i.e. crontab job) to run Python script on Xubuntu 12.04?  Step 1. Install a GUI front-end to configure crontab jobs on Xubuntu Install 'Scheduled tasks' on your Xubuntu, with the below command: $ sudo apt-get install gnome-schedule Step 2. Schedule a task to run a Python script i. Make sure your Python script has executable right, if not run the below command: $ chmod a+x ~/foo.py ii. Now, fire-up the 'Scheduled tasks' GUI, by running the below command: $ gnome-schedule & iii. Lets say, you wanted to schedule the above Python script to be executed once every 3hour-and-15th minute, then your configuration should reflect the below: 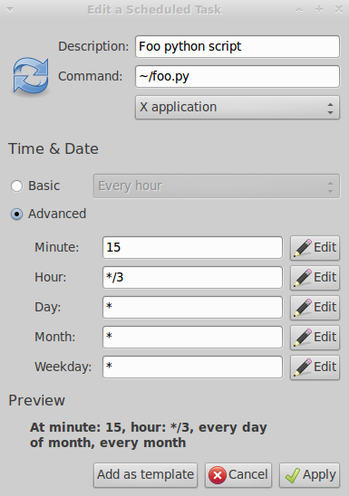  Prerequisites:
- Mercurial (Hg) - Python 2.6 & above If you are a fan of automated tool-chain + you are using Hg as a version control for your documents (for e.g. source-code/text documents/among other complex document formats). You may find this blog-post to be of interest. Here, I will take you through a step-by-step instructions on how to customise your local Hg repository to automatically commit and push changeset. Note! Here the auto-commit only takes place for changes made to previously staged files and push this changeset to a remote repository (for e.g. like a Hg repository hosted on Bitbucket). Make note of the hypothetical repositories: a) Local repository: Lets consider that your local Hg repository is called 'Test_Hg_Repos' and is located in your home directory i.e. '~/Test_Hg_Repos'. And this repository contains a single file called 'File1.txt'. b) Remote repository: Lets consider that your remote Hg repository is also called 'Test_Hg_Repos' and presumed to be host on Bitbucket. Step 1. Create a Python script The below Python script checks if the staged file/s is/are modified in your above mentioned Hg repository & then commit's the changeset: #!/usr/bin/python from mercurial import ui, hg from datetime import datetime repo = hg.repository(ui.ui(), '~/Test_Hg_Repos') repo.ui.pushbuffer() s = repo.status() # Commit modifications to the staged items if len(s[0]) > 0: now = datetime.today() msg = "New modifications on %s" % now repo.commit(msg) Step 2. Provide executable rights to the above Python script Lets say you have named the above Python script as 'Commit_On_Modifcation.py'. Now, run the below command to give it executable rigths: $ chmod x Commit_On_Modifcation.py Step 3. Configure remote repository path Make sure that the remote repository path is set in the local Hg repository's configuration file [Note! Here the remote Hg repository is assumed to be host on Bitbucket]. In order to check whether the remote repository path is set. Open the this file '~/Test_Hg_Repos/.hg/hgrc'. For e.g. if you have set the SSH path for your remote repository, then it will look as follows: [paths] default = ssh://hg@accountusername1/accountusername1/test_hg_repos Note! @accountusername1 <= Refers to an alias set for the SSH-key, for more on this refer to the this blog post's Step 1 to 6. Step 4. Configure auto push on commit In your local Hg repository, set the Hg native hook to automatically push on commit. So, open the file '~/Test_Hg_Repos/.hg/hgrc' and add the following content: [hooks] commit.autopush = hg push Step 5. Test auto commit & push Here it is presumed that you have already made an initial commit of your local Hg repository & the 'File1.txt' file is staged. So now, lets test if auto commit & push on modification of the staged file works: i. Now, modify the contents of the 'File1.txt' file, which is in your local Hg repository ii. Run the Python script that commit's & push's, by running the below command: $ ./Commit_On_Modifcation.py I hope, now you are able to automatically commit the local changes & push the changeset to your remote repository successfully with a single script. |
AuthorCategories
All
Archives
January 2019
|
 RSS Feed
